
Hyprland Config Guide: Setup on Linux
Aug 17, 2024
Introduction
Hyprland provides the latest Wayland features, dynamic tiling, all the eyecandy, powerful plugins and much more
Today, I will share my window manager configuration. Window managers changed the way I use my computer and immensely boosted my productivity and efficiency. I have used most of the major window managers: i3, sway, hyprland. While i3 is X11 based, sway and hyprland are Wayland based. I have been using hyprland for a while now and I am very happy with it. It is a very powerful and feature-rich window manager.
Actually, it’s my second time trying out Hyprland. First time, I had many issues with it and then switched back to Sway. But then, I gave Hyprland another choice, I had a better experience this time. However, it’s important to note that Hyprland is still less stable than i3 or Sway. As much as it’s eyecandy, I wouldn’t recommend it to novice Linux users. However, if you are an experienced user and want to try something new, it is a great choice.
You should consult to the original wiki for any issues or questions: Hyprland Wiki. I will share my configuration files and some tips that I have learned while using Hyprland. This is not a replacement for the official documentation, but rather a guide to help you get started. Also the applications and techniques can be used in other window managers as well. So, I aim to inspire you to try new things and customize your system to your liking.
Table of Contents
Motivation
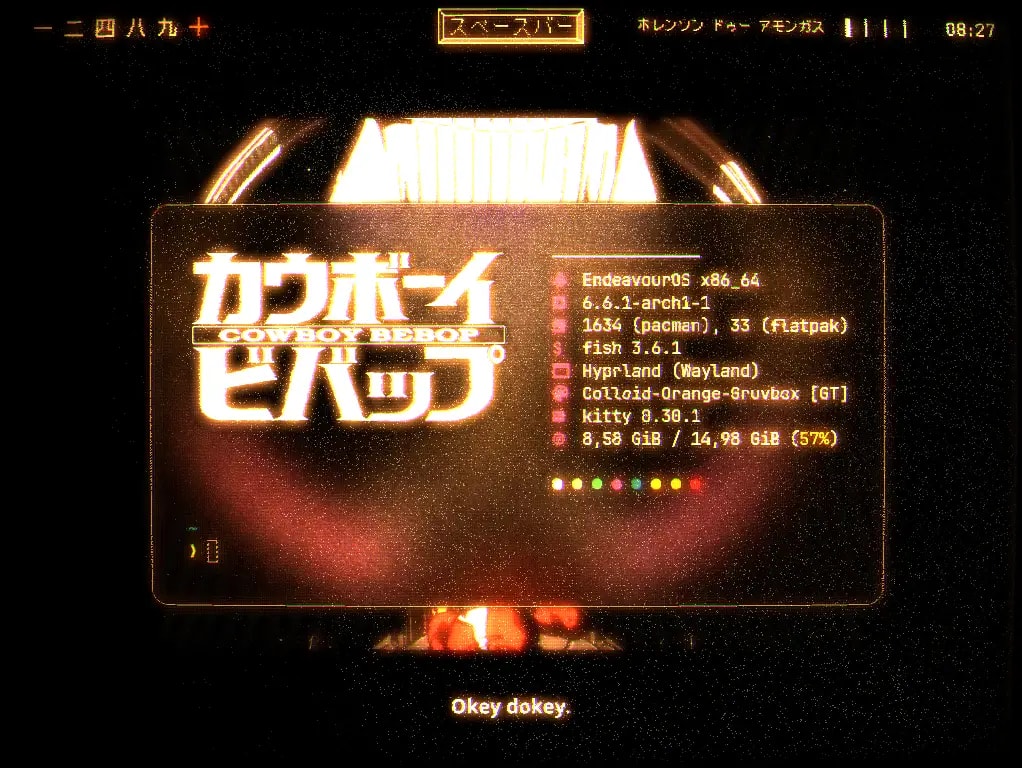
- My humble desktop:


Links to the configs above:
Theming
My desktop is not as fancy as the hall of fame examples because I mostly like to work on a minimalistic desktop. You could configure it to be spaceship if you want. You can take a look at this subreddit for inspiration: r/unixporn
Guide
Directory Structure
Here is how my ~/.config/hypr directory looks like: You don’t need to create all of these files, you can start with the default configuration and then customize it to your liking. Also you can stuff everything in a single file, but I prefer to keep things organized.
env.conf
hypridle.conf
hyprland.conf
hyprlock.conf
hyprpaper.conf
keybinding.conf
monitor.conf
startup.conf
visual.conf
window_rule.conf
Configuration Files
env.conf
This file is for environment variables. You can set environment variables for your session here. Here are some of the environment variables that I set. I marked the important ones that every Hyprland user should set.
env = XDG_CURRENT_DESKTOP,Hyprland # !important
env = XDG_SESSION_TYPE,wayland # !important
env = XDG_SESSION_DESKTOP,Hyprland # !important
env = QT_QPA_PLATFORM,wayland  # !important
env = MOZ_ENABLE_WAYLAND,1 # !important
env = MOZ_DBUS_REMOTE,1
env = SDL_VIDEODRIVER,wayland
env = _JAVA_AWT_WM_NONREPARENTING,1
env = CLUTTER_BACKEND,wayland
env = HYPRCURSOR_SIZE,24
env = XCURSOR_SIZE,24
hyprland.conf
This is the main configuration file for Hyprland. You can set general settings here. Here is an example configuration file, I will explain the important parts below with comments.
# You can set variables with the $ sign
$mod = SUPER
$terminal = kitty
$browser = firefox
$file_manager = yazi

# We need to source other configuration files
source=~/.config/hypr/env.conf
source=~/.config/hypr/keybinding.conf
source=~/.config/hypr/monitor.conf
source=~/.config/hypr/startup.conf
source=~/.config/hypr/window_rule.conf
source=~/.config/hypr/visual.conf


# For all options: https://wiki.hyprland.org/Configuring/Variables/#general
general {
    border_size = 4
    gaps_in = 5
    gaps_out = 10
    col.active_border = rgba(D991FDFF)
    col.inactive_border = rgba(595959aa)
}

# https://wiki.hyprland.org/Configuring/Variables/#input
# Since I'm using a Turkish keyboard layout, I set it here.
# I also have a habit of using caps as escape. It's great for Vim users!
input {
    kb_layout = tr
    kb_variant =
    kb_model =
    kb_options = caps:escape
    kb_rules =

    follow_mouse = 1

    sensitivity = 0 # -1.0 - 1.0, 0 means no modification.

    touchpad {
        natural_scroll = false
    }
}

# https://wiki.hyprland.org/Configuring/Variables/#gestures
# You can set gestures here. I have the workspace swipe with a cool Mac-like animation.
gestures {
    workspace_swipe = true
    workspace_swipe_fingers = 3
}
keybinding.conf
This is the file that changes your workflow the most. Create your own keybindings, set your own shortcuts. Here is an example configuration file. I will explain the important parts below with comments.
### BINDS ###

## Applications ##
bind = $mod, Q, exec, $terminal
bind = $mod, B, exec, $browser
bind = $mod, N, exec, $terminal $file_manager
bind =, Print, exec, grim -g "$(slurp)" -t png # Take a screenshot with "Print" key. Choose the area with your mouse.
bind = $mod, A, exec, pkill rofi || rofi -show drun -show-icons # This is an application launcher
bind = $mod SHIFT, A, exec, pkill rofimoji ||  rofimoji # We can even use rofi to find emojis!
bind = $mod, L, exec, pkill rofi || rofi -show power-menu -modi power-menu:rofi-power-menu # We can use rofi for power management as well
bind = $mod SHIFT, L, exec, hyprlock
bind = $mod, M, exec, firefox --new-window music.youtube.com

## Audio ##
# I use special scripts to control volume and brightness.
# These scripts shows a notification when you change the volume or brightness.
binde=, XF86AudioRaiseVolume, exec,  ~/.config/dunst/volume.sh up
binde=, XF86AudioLowerVolume, exec,  ~/.config/dunst/volume.sh down
binde=, XF86AudioMute, exec,  ~/.config/dunst/volume.sh mute
binde=, XF86AudioMicMute, exec, pactl set-source-mute
## Brightness ##
binde=, XF86MonBrightnessUp, exec,  ~/.config/dunst/brightness.sh up
binde=, XF86MonBrightnessDown, exec,   ~/.config/dunst/brightness.sh down

## Window Management ##
bind = $mod, C, killactive, # kill the focused window
bind = $mod, SPACE, togglefloating, # toggle floating mode
bind = $mod, F, fullscreen, # make the focused window fullscreen
bind = $mod, P, pseudo, # dwindle
bind = $mod, J, togglesplit, # dwindle

bind = $mod SHIFT, left, movewindow, l
bind = $mod SHIFT, right, movewindow, r
bind = $mod SHIFT, up, movewindow, u
bind = $mod SHIFT, down, movewindow, d

## Workspace Management ##
bind = $mod, S, togglespecialworkspace

bind = $mod, mouse_down, workspace, e+1
bind = $mod, mouse_up, workspace, e-1
bindm = $mod, mouse:272, movewindow
bindm = $mod, mouse:273, resizewindow

bind = $mod, 1, workspace, 1
bind = $mod, 2, workspace, 2
bind = $mod, 3, workspace, 3
bind = $mod, 4, workspace, 4
bind = $mod, 5, workspace, 5
bind = $mod, 6, workspace, 6
bind = $mod, 7, workspace, 7
bind = $mod, 8, workspace, 8
bind = $mod, 9, workspace, 9
bind = $mod, 0, workspace, 10

bind = $mod SHIFT, 1, movetoworkspace, 1
bind = $mod SHIFT, 2, movetoworkspace, 2
bind = $mod SHIFT, 3, movetoworkspace, 3
bind = $mod SHIFT, 4, movetoworkspace, 4
bind = $mod SHIFT, 5, movetoworkspace, 5
bind = $mod SHIFT, 6, movetoworkspace, 6
bind = $mod SHIFT, 7, movetoworkspace, 7
bind = $mod SHIFT, 8, movetoworkspace, 8
bind = $mod SHIFT, 9, movetoworkspace, 9
bind = $mod SHIFT, 0, movetoworkspace, 10
bind = $mod SHIFT, S, movetoworkspace, special

bind = $mod, left, movefocus, l
bind = $mod, right, movefocus, r
bind = $mod, up, movefocus, u
bind = $mod, down, movefocus, d

# You can create custom modes.
## Resize Mode ##
bind= $mod, R, submap,resize

submap=resize

binde=,right,resizeactive,10 0
binde=,left,resizeactive,-10 0
binde=,up,resizeactive,0 -10
binde=,down,resizeactive,0 10

bind=,escape,submap,reset
submap=reset
monitor.conf
If you have multiple monitors or want to configure your monitor settings, you can do it here.
## MONITOR CONFIGURATION ##
monitor=eDP-1,1920x1080@60,3440x0,1, # laptop screen, on the right
monitor=HDMI-A-1,disable # touchpad screen, I disable it
monitor=HDMI-A-2,[email protected],0x0,1 # ultrawide monitor, on the left
startup.conf
You can set applications to start when you start your session:
## STARTUP APPLICATIONS ##
exec-once=hyprpaper # wallpaper manager for hyprland
exec-once=waybar # status bar
exec-once=dunst # notification daemon
exec-once=libinput-gestures # touchpad gestures (three finger swipe for workspace switch)
exec-once=syncthing --no-browser # file synchronization
exec-once=hypridle # idle manager for hyprland (lock screen after X minutes, turn off screen after Y minutes)
exec-once=nm-applet # network manager applet (shows network status)
exec-once=blueman-applet # bluetooth manager applet
exec-once=dbus-update-activation-environment --systemd WAYLAND_DISPLAY XDG_CURRENT_DESKTOP=Hyprland # ensure that dbus services are started correctly
exec-once=copyq --start-server # clipboard manager, shows clipboard history
# You can create a special workspace that is overlayed on all workspaces.
# can be toggled on and off with a keybinding.
# you can use it to open your email client or music player so that you can access it from anywhere.
exec-once=[workspace special silent] thunderbird
visual.conf
You can define the visual settings of Hyprland here. You can set the colors, animations, decorations, etc. I use a very minimal setup here:
decoration {
    rounding = 8
}

animations {
    animation = specialWorkspace, 1, 5, default, fade
}
window_rule.conf
Window rules are used to set the behavior of windows, they are very useful. You can set all kinds of different behaviors such as floating, fullscreen, opacity, etc. You can also combine multiple rules. Here is an example minimal configuration file:
windowrulev2 = float,class:(org.pulseaudio.pavucontrol) # open in floating mode
windowrulev2 = float,class:(blueman-manager)
windowrulev2 = float,class:(^zoom$) # open all zoom windows in floating mode
windowrulev2 = float,class:(org.qbittorrent.qBittorrent)
windowrulev2 = float,class:(anki)
windowrulev2 = idleinhibit fullscreen, class:.* # if a window is fullscreen, don't idle
windowrulev2 = opacity 0.8, class:($terminal) # set opacity to 0.8 for terminal, a variable we defined in hyprland.conf
Hyprpaper
Hyprpaper is a wallpaper manager for Hyprland. You can set wallpapers for each monitor, I use the same for both of my monitors but you can experiment:
preload = ~/BahadirAydin/dotfiles/assets/wallpapers/retro.jpg

wallpaper = HDMI-A-2, ~/BahadirAydin/dotfiles/assets/wallpapers/retro.jpg
wallpaper = eDP-1, ~/BahadirAydin/dotfiles/assets/wallpapers/retro.jpg
ipc = off
Hypridle
hypridle is an idle manager for Hyprland. You can set it to lock your screen after a certain amount of time, turn off your screen, etc. Here is an example configuration file:
general {
    ignore_dbus_inhibit = false # if true, hypridle will ignore dbus inhibit requests
    ignore_systemd_inhibit = false # if true, hypridle will ignore systemd inhibit requests
}

# Locks after 5 minutes
listener {
    timeout = 300                           # 5min
    on-timeout = hyprlock                   # command to run when timeout has passed
    # on-resume = notify-send "Welcome back!" # command to run when activity is detected after timeout has fired.
}
# Suspends after 15 minutes
listener {
    timeout = 900                           # 15min
    on-timeout = hyprctl dispatch dpms off  # command to run when timeout has passed
    on-resume = hyprctl dispatch dpms on    # command to run when activity is detected after timeout has fired.
}
Hyprlock
Hyprlock is a lock screen for Hyprland. You can set the lock screen image, the blur level, etc. You can create stunning lock screens. My configuration is adapted from this justinmdickey hyprlock config:
$background = rgb(11111b)
$foreground = rgb(cdd6f4)
$color0 = rgb(1e1e2e)
$color1 = rgb(f38ba8)
$color2 = rgb(a6e3a1)
$color3 = rgb(f9e2af)
$color4 = rgb(89b4fa)
$color5 = rgb(cba6f7)
$color6 = rgb(94e2d5)
$color7 = rgb(cdd6f4)
$color8 = rgb(313244)
$color9 = rgb(eba0ac)
$color10 = rgb(fab387)
$color11 = rgb(f5c2e7)
$color12 = rgb(74c7ec)
$color13 = rgb(f5e0dc)
$color14 = rgb(b4befe)
$color15 = rgb(bac2de)

# BACKGROUND
background {
    monitor =
    path = ~/BahadirAydin/dotfiles/assets/wallpapers/custom.png
    blur_passes = 0
    contrast = 0.8916
    brightness = 0.8172
    vibrancy = 0.1696
    vibrancy_darkness = 0.0
}

# GENERAL
general {
    no_fade_in = false
    grace = 0
}

# INPUT FIELD
input-field {
    monitor =
    size = 240, 60
    outline_thickness = 1
    dots_size = 0.2 # Scale of input-field height, 0.2 - 0.8
    dots_spacing = 0.2 # Scale of dots' absolute size, 0.0 - 1.0
    dots_center = true
    outer_color = rgba(0, 0, 0, 0)
    inner_color = rgba(0, 0, 0, 0.8)
    font_color = rgb(200, 200, 200)
    fade_on_empty = false
    font_family = JetBrains Mono Nerd Font Mono
    placeholder_text = <i><span foreground="##cdd6f4">Input Password...</span></i>
    hide_input = false
    position = 0, 240
    halign = center
    valign = bottom
}

# TIME
label {
    monitor =
    text = cmd[update:1000] echo "$(date +"%-I:%M%p")"
    color = #fff
    font_size = 100
    font_family = JetBrains Mono Nerd Font Mono ExtraBold
    position = 0, -120
    halign = center
    valign = top
}

# USER
label {
    monitor =
    text = Bahadır Aydın
    color = $foreground
    font_size = 16
    font_family = JetBrains Mono Nerd Font Mono
    position = 0, 180
    halign = center
    valign = bottom
}
I hope you enjoyed this guide. I tried to keep it simple and to the point. I hope you will try Hyprland and customize it to your liking. If you have any questions or suggestions, feel free to reach out to me.